Appearance

Scheduling recurring tasks / cron jobs is a core capability for many applications - backups, sending emails, cleaning old data, etc. Below are 4 modern serverless-friendly ways to setup a cron job, pros/cons and when you might pick one over another.
GitHub Actions
GitHub Actions is GitHub’s CI/CD / workflow automation system. One of its triggers is schedule, which allows workflows to run on a cron schedule.
How to Setup a Cron Job using GitHub Actions?
1. Create a workflow file named website-uptime-check.yml inside the .github/workflows/ directory and add the following script:
yml
name: Website Uptime Check

on:
  schedule:
    - cron: "*/5 * * * *" # every 5 minutes
  workflow_dispatch:

jobs:
  ping:
    runs-on: ubuntu-latest
    steps:
      - name: Curl website
        run: |
          URL="https://bockdev.com"
          STATUS=$(curl -o /dev/null -s -w "%{http_code}\n" $URL)
          echo "Checked $URL - Status $STATUS at $(date)"
2. Next, create a new GitHub repo (e.g., cron-job or any name you prefer) and push the workflow file to it.
NOTE
The workflow(s) run from the repository’s default branch. If your default branch is main, that’s what triggers.
3. Check the result in the Actions tab of that Github repo.
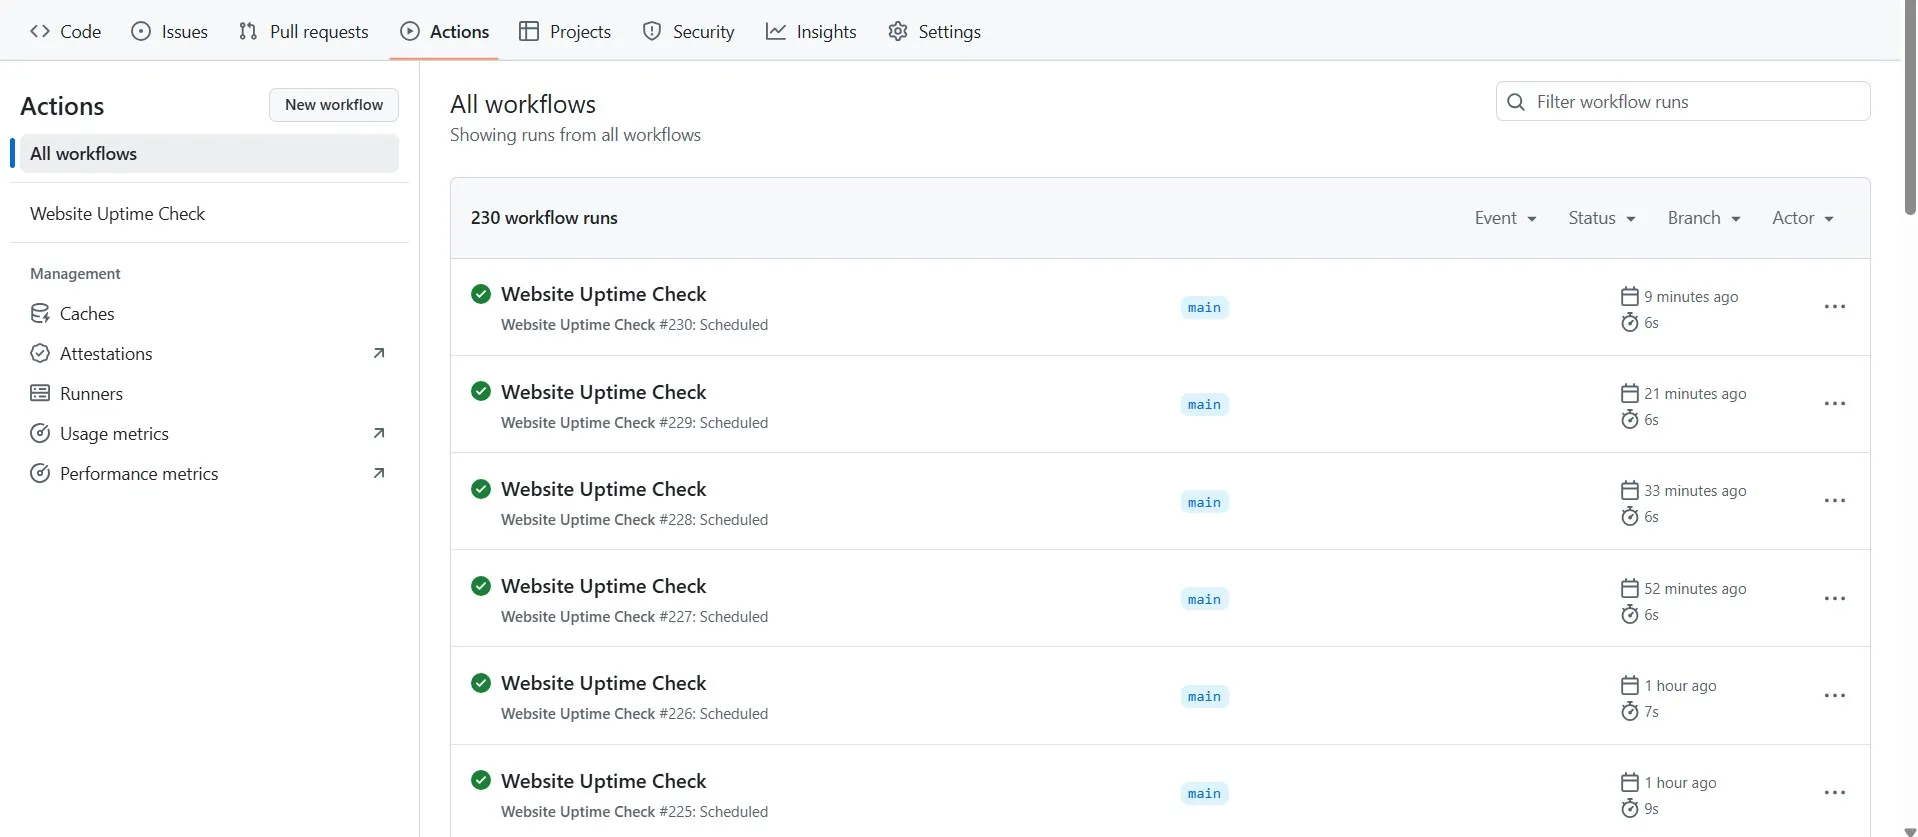
Github Actions Website Uptime Check.
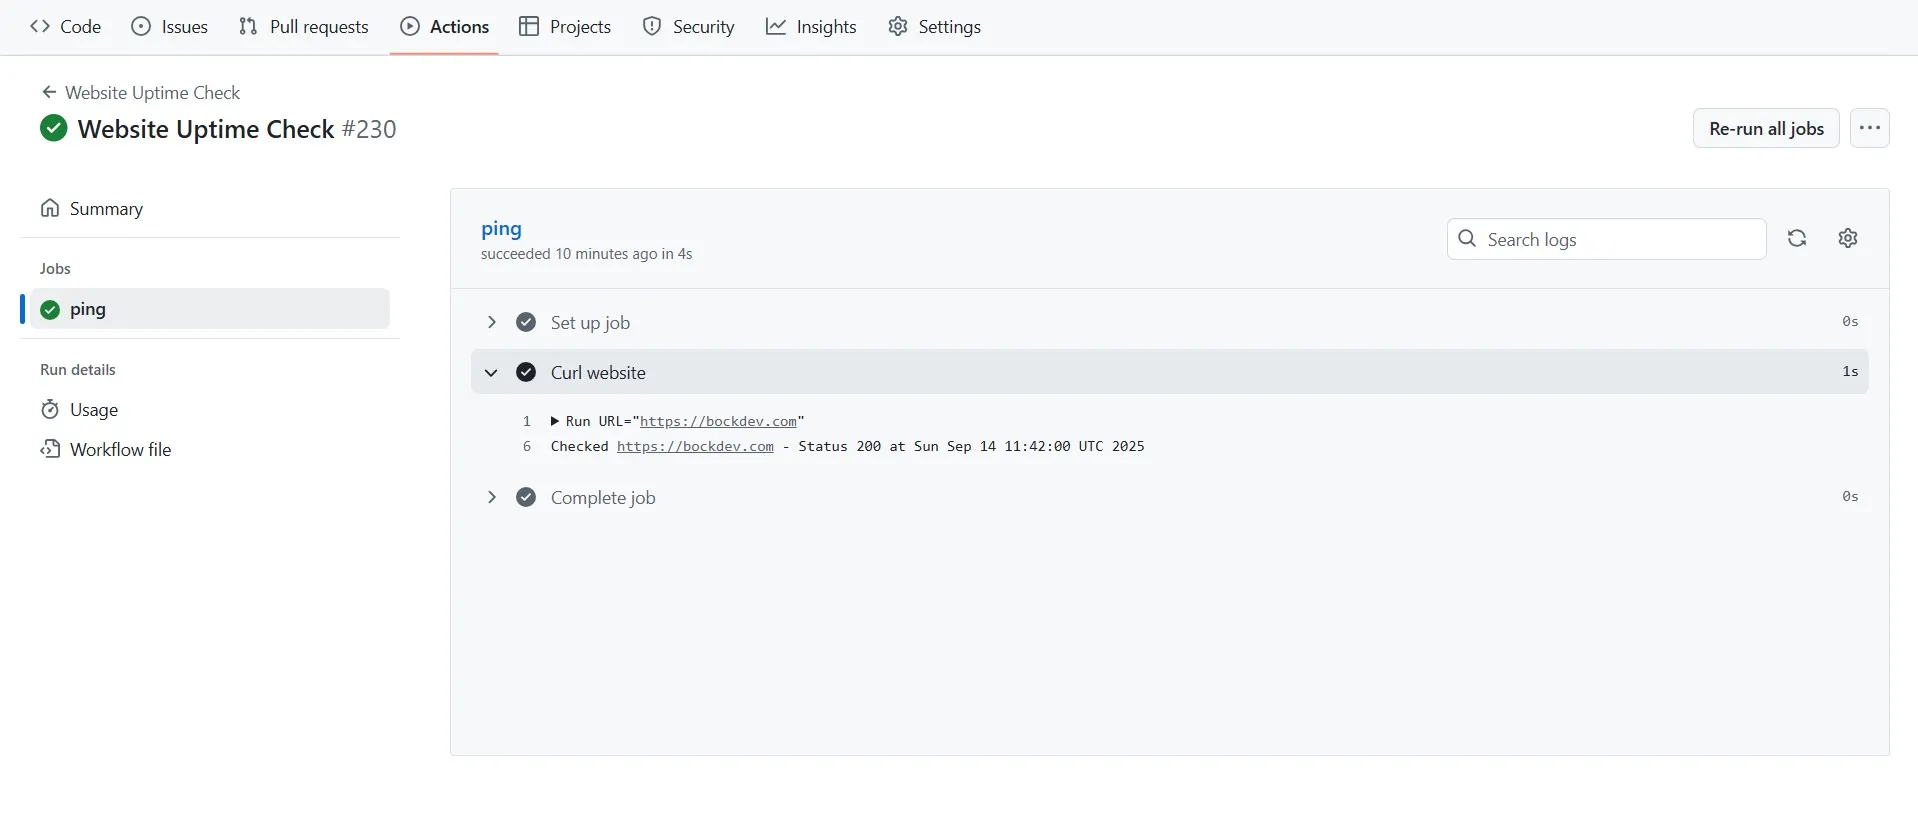
Github Actions Website Uptime Check Executed Successfully.
NOTE
Although GitHub Actions allows a minimum interval of 5 minutes, the task may not run exactly every 5 minutes. This makes it unsuitable for inventory management or other use cases that require consistent, reliable execution.
| Pros | Cons |
|---|---|
| Easy to set up if project is already on GitHub | Only runs inside GitHub ecosystem |
| Free tier is generous (especially for open-source) | Limited runtime and environment options |
| No extra infrastructure required | Cron jobs always in UTC, no native timezone support |
Cloudflare Workers
Cloudflare Workers is an edge-compute serverless platform. It supports Cron Triggers so you can map a cron expression to a Worker, which will run the scheduled(event) when the cron matches.
How to Setup a Cron Job using Cloudflare Workers?
1. Begin on the Cloudflare Workers initial page, delete data.js and welcome.html files, and place the following code in index.js:
js
export default {
	async fetch(request, env, ctx) {
		return new Response("Worker is running with cron triggers!");
	},

	async scheduled(event, env, ctx) {
		ctx.waitUntil(checkWebsite(env));
	}
}

async function checkWebsite(env) {
	const url = env.WEBSITE_URL; // set in worker environment variables
	try {
		const response = await fetch(url, { method: "GET" });

		if (response.ok) {
			console.log(`[UP] ${url} responded with status ${response.status}`);
		} else {
			console.error(`[DOWN] ${url} responded with status ${response.status}`);
			// optionally send alert (email, Slack, Discord, etc.)
		}
	} catch (error) {
		console.error(`[ERROR] Could not reach ${url}:`, error);
		// optionally trigger alert here
	}
}
2. Add a new variable named WEBSITE_URL and set its value to https://bockdev.com (or your own domain).
3. Configure a trigger event by selecting Cron Triggers and setting your desired schedule (e.g., run the Worker every 5 minutes).
4. To review the result, search for Compute (Workers) in the sidebar, then go to Workers & Pages. Open the worker you created, switch to the Logs tab, and check the logs generated after the cron job runs.
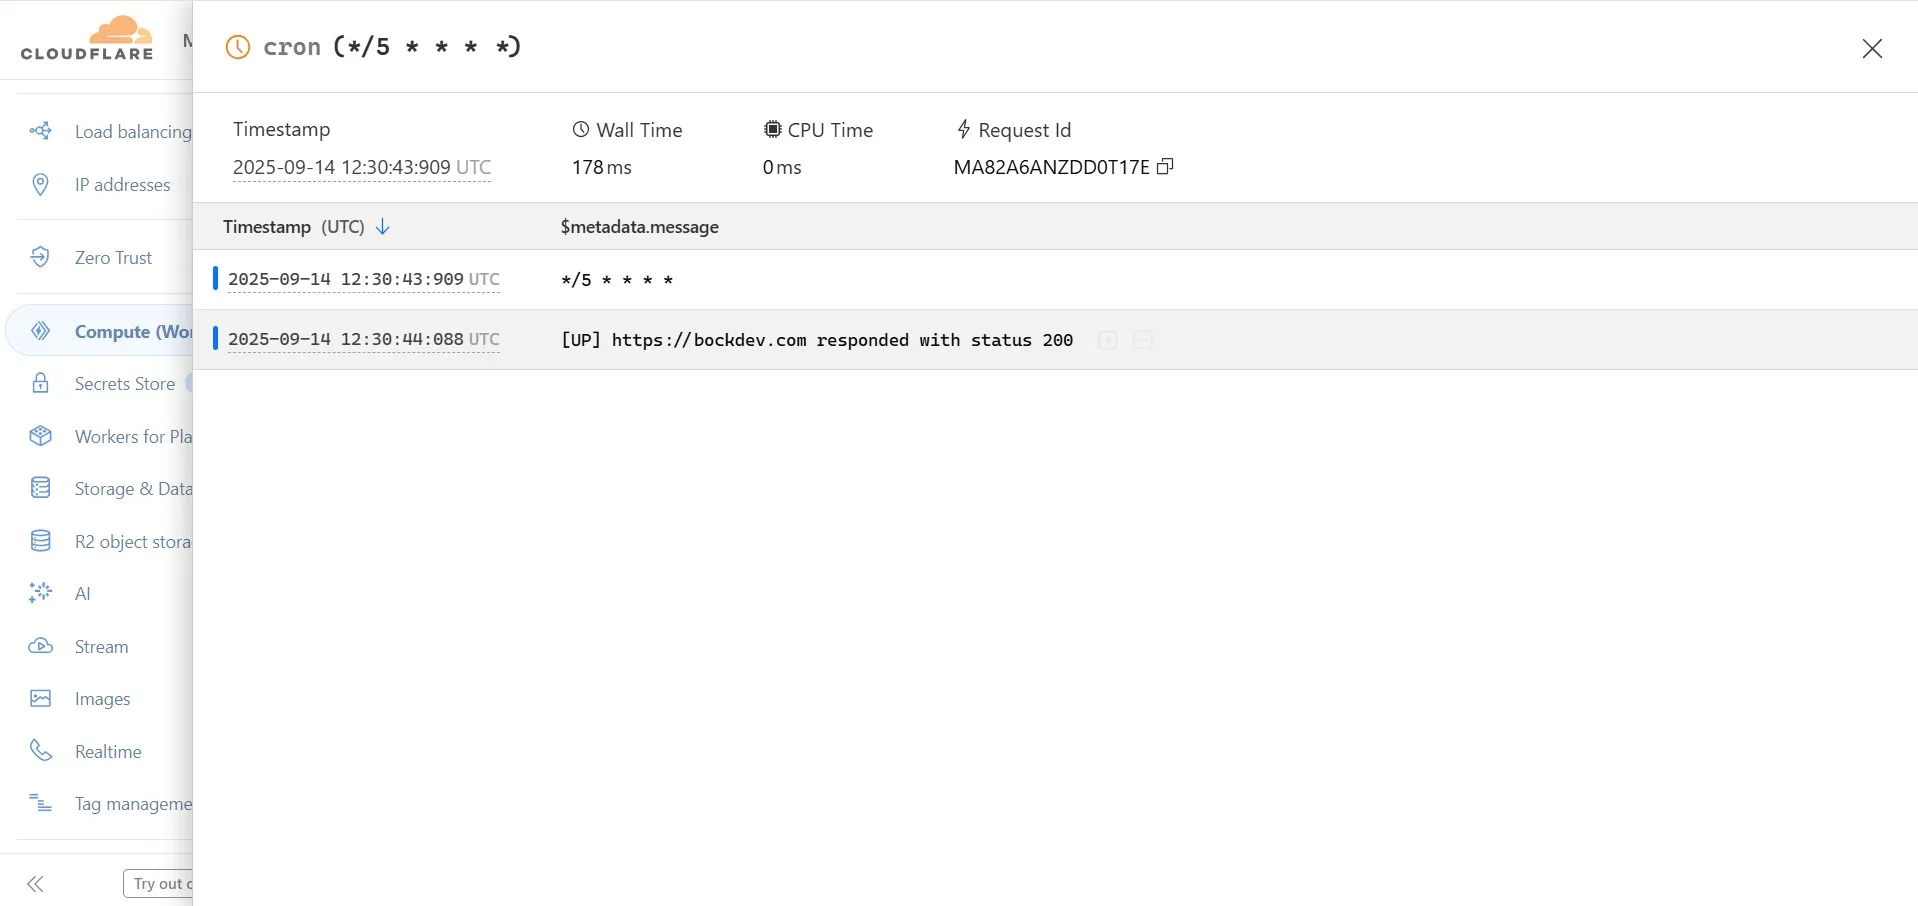
Cloudflare Workers Website Uptime Check Log.
| Pros | Cons |
|---|---|
| Edge execution = fast, low latency | Limited runtime (CPU/memory/time constraints) |
| Highly scalable and reliable (global edge network) | Debugging scheduled tasks can be harder |
| Ideal for lightweight scheduled tasks (API calls, KV updates) | Costs may rise with frequent or heavy jobs |
AWS Lambda + EventBridge
AWS Lambda lets you run code without managing servers. EventBridge (formerly CloudWatch Events) provides the scheduling (cron or rate-based). You combine them so that EventBridge rules trigger Lambda functions on a schedule.
AWS Lambda Free Tier:
- 1,000,000 free requests per month.
- Up to 400,000 GB-seconds or 3.2 million seconds of compute time per month.
NOTE
Keep in mind that after 1M free monthly requests with Lambda, you will be charged $0.20 or more per 1M requests, depending on your selected region.
EventBridge Scheduler Free Tier:
- 14,000,000 free invocations per month.
How to Setup a Cron Job using AWS Lambda + EventBridge?
1. Log in to AWS, navigate to the Lambda service and create a new function by entering the function name, selecting the runtime (Node.js 22.x) and choosing the architecture (x86_64).
2. Open the Lambda function you created, click Add trigger, search for EventBridge, and select Add. Next, choose Create a new rule, enter a rule name, and set the schedule expression to rate(5 minutes).
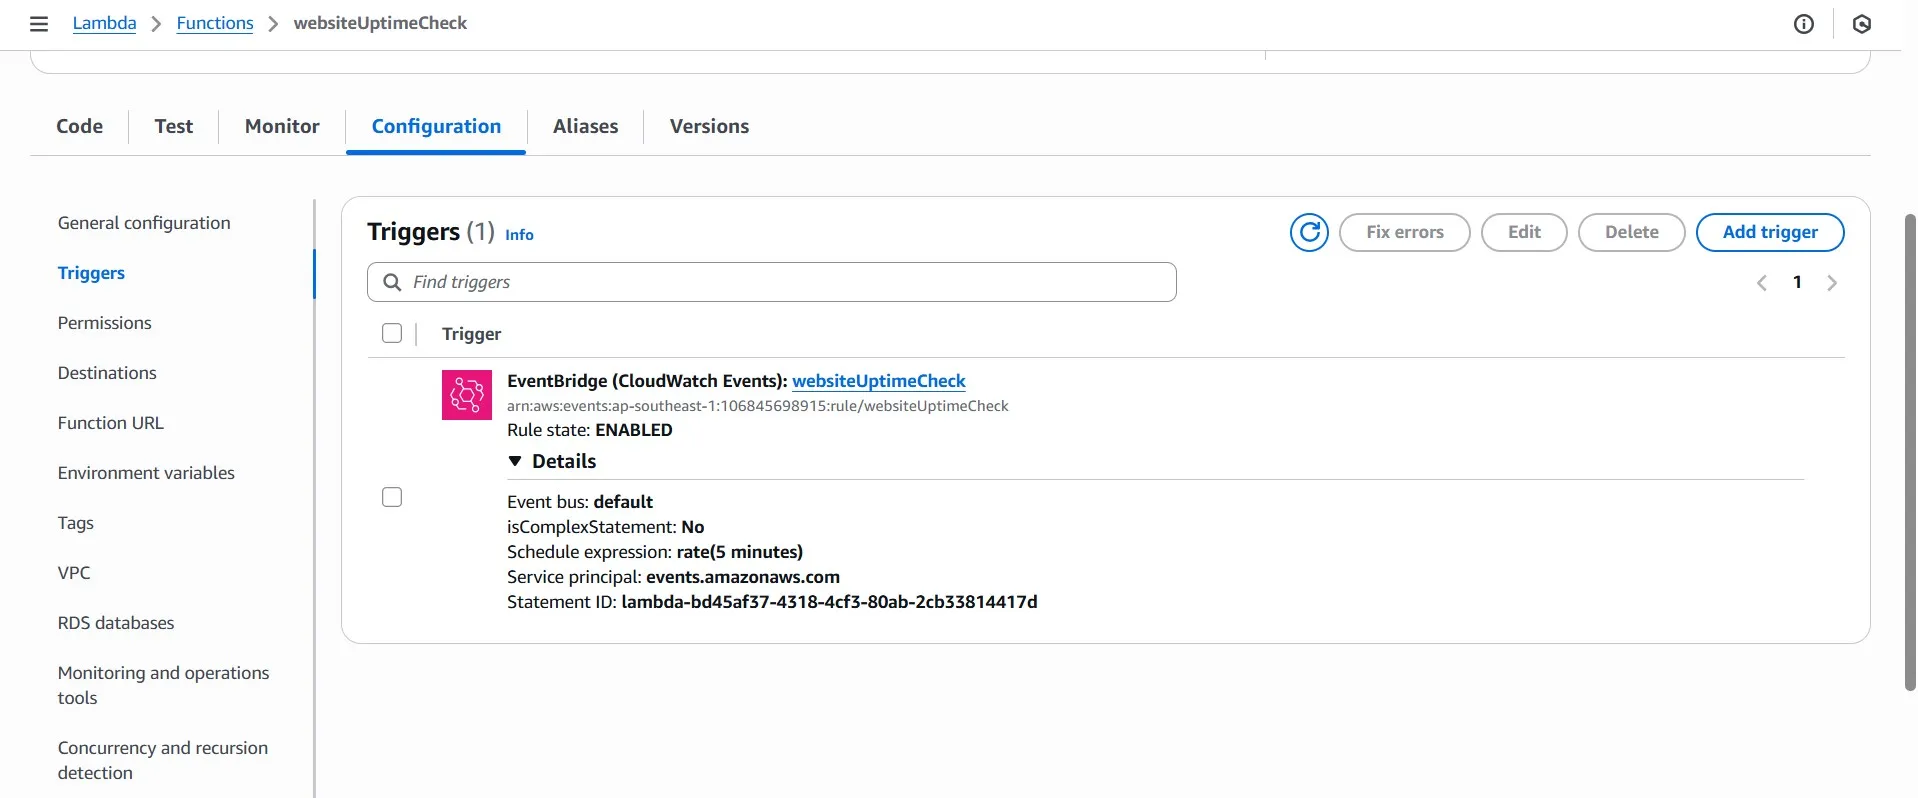
EventBridge.
3. Within the same Lambda function, scroll down to the Code section and paste:
js
// index.mjs
export const handler = async (event) => {
  const WEBSITE_URL = "https://bockdev.com"; // replace with your site
  try {
    const res = await fetch(WEBSITE_URL);

    let message;
    if (res.ok) {
      message = `[UP] ${WEBSITE_URL} responded with ${res.status} at ${new Date().toISOString()}`;
    } else {
      message = `[DOWN] ${WEBSITE_URL} responded with ${res.status} at ${new Date().toISOString()}`;
    }

    console.log(message);

    return {
      statusCode: 200,
      body: JSON.stringify({ result: message }),
    };
  } catch (err) {
    const errorMsg = `[ERROR] Could not reach ${WEBSITE_URL}: ${err.message}`;
    console.error(errorMsg);

    return {
      statusCode: 500,
      body: JSON.stringify({ error: errorMsg }),
    };
  }
};
After adding the code, remember to click the Deploy button on the left.
4. To review the result, go to Monitor section and click "View CloudWatch logs" on the right.
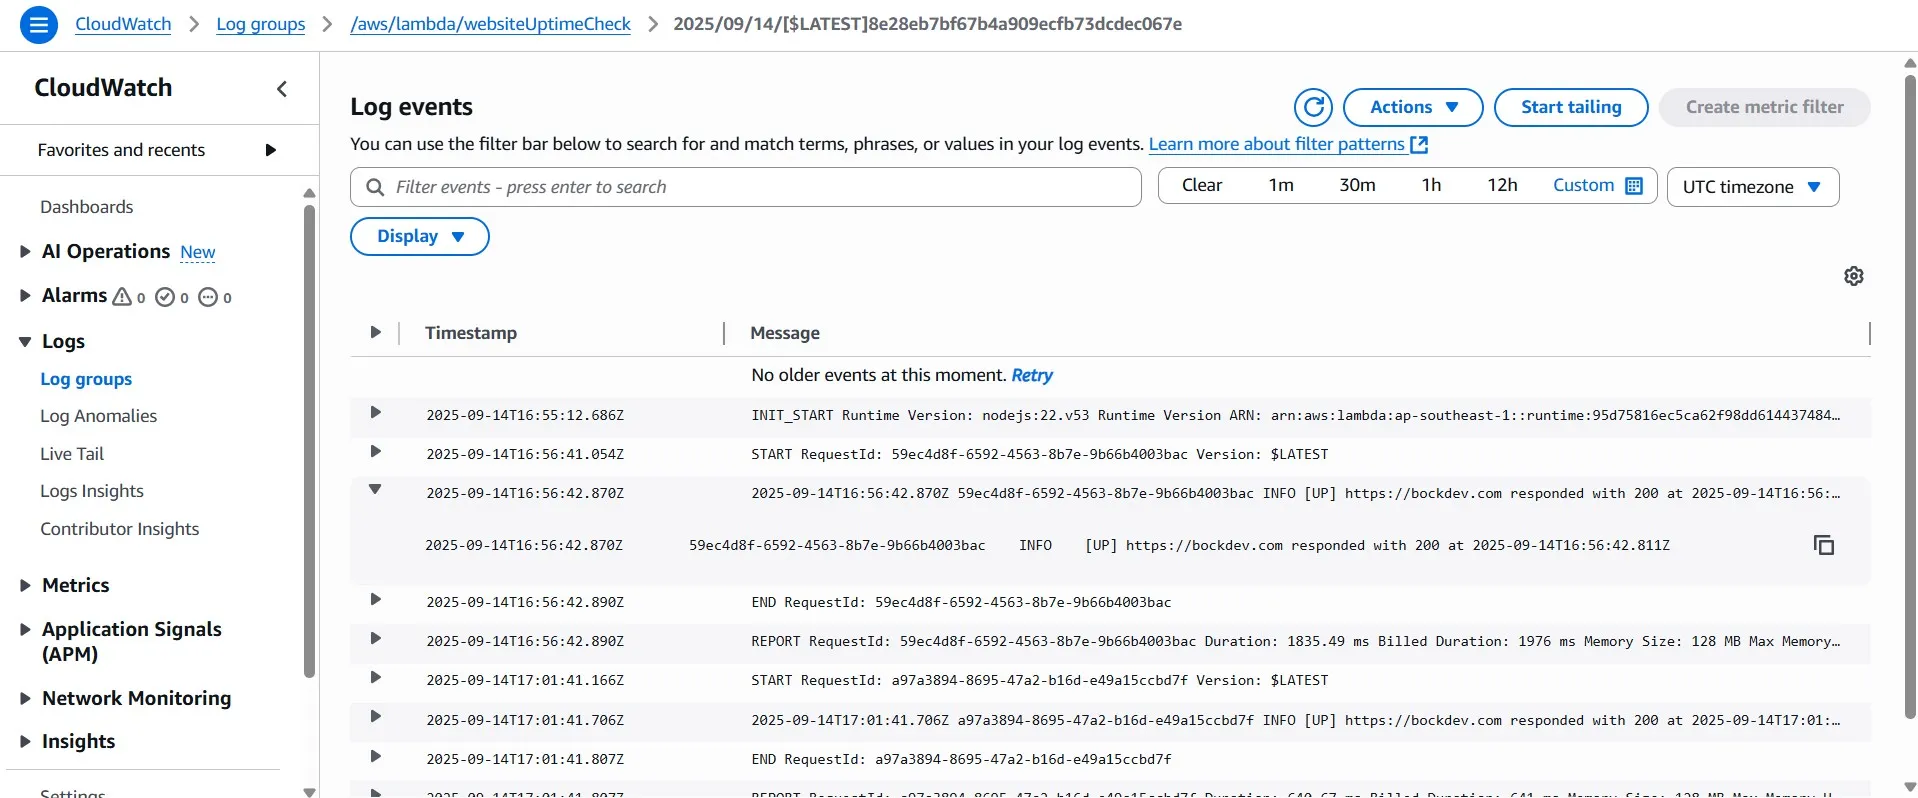
CloudWatch Logs.
| Pros | Cons |
|---|---|
| Deep integration with AWS ecosystem (S3, SNS, etc.) | Setup is more complex (IAM, permissions, roles) |
| Scalable, reliable, with strong SLAs | Cold starts can affect performance |
| Supports both cron and rate expressions | Costs add up with frequent invocations |
| Fine-grained scheduling, retries, error handling | Overkill for small/simple cron jobs |
Vercel Cron Jobs
Vercel Cron Jobs let you run serverless functions on a schedule without external schedulers. You define cron expressions in your vercel.json config, and Vercel automatically triggers the linked API routes at the specified times. This makes it ideal for projects already hosted on Vercel.
How to Setup a Cron Job using Vercel?
Reminder
Ensure that NodeJS 18.8 or a later version is installed on your system before starting.
1. To create a Next.js project using the CLI, run:
bash
npx create-next-app@latestThe installation will display the following prompts.
bash
What is your project named? my-app
Would you like to use TypeScript? No / Yes
Which linter would you like to use? ESLint / Biome / None
Would you like to use Tailwind CSS? No / Yes
Would you like your code inside a `src/` directory? No / Yes
Would you like to use App Router? (recommended) No / Yes
Would you like to use Turbopack? (recommended) No / Yes
Would you like to customize the import alias (`@/*` by default)? No / Yes
What import alias would you like configured? @/*
Once you complete the prompts, create-next-app will create a project folder with your chosen project name and preferences.
2. Next, create a app/api/cron/route.ts file and add:
ts
import type { NextRequest } from 'next/server';

export async function GET(request: NextRequest) {
  const authHeader = request.headers.get('authorization');
  if (authHeader !== `Bearer ${process.env.CRON_SECRET}`) {
    return new Response('Unauthorized', {
      status: 401,
    });
  }

  // Website uptime check
  const websiteUrl = 'https://bockdev.com'; // Replace with the URL you want to check
  try {
    const response = await fetch(websiteUrl);
    if (response.ok) {
      return Response.json({ success: true, message: `${websiteUrl} is up.` });
    } else {
      return Response.json({ success: false, message: `${websiteUrl} is down.`, status: response.status });
    }
  } catch (error) {
    const errorMessage = (error instanceof Error) ? error.message : String(error);
    return Response.json({ success: false, message: `Failed to check ${websiteUrl}.`, error: errorMessage });
  }
}
3. Then, create a vercel.json file in the root of your project folder and add:
json
{
  "$schema": "https://openapi.vercel.sh/vercel.json",
  "crons": [
    {
      "path": "/api/cron",
      "schedule": "0 0 * * *"
    }
  ]
}
NOTE
On Vercel's free tier, cron jobs can only run daily, so the schedule must be set to 0 0 * * *.
4. Next, create a new repo on GitHub, then import and deploy it to Vercel.
5. Prepare a CRON_SECRET. It’s recommended to use a random string of at least 16 characters. To generate one, run:
bash
node -e "console.log(require('crypto').randomBytes(16).toString('hex'))"6. Go to your Vercel project, navigate to Settings -> Environment Variables, and set the key to CRON_SECRET with the value as <cron_secret_you_created>.
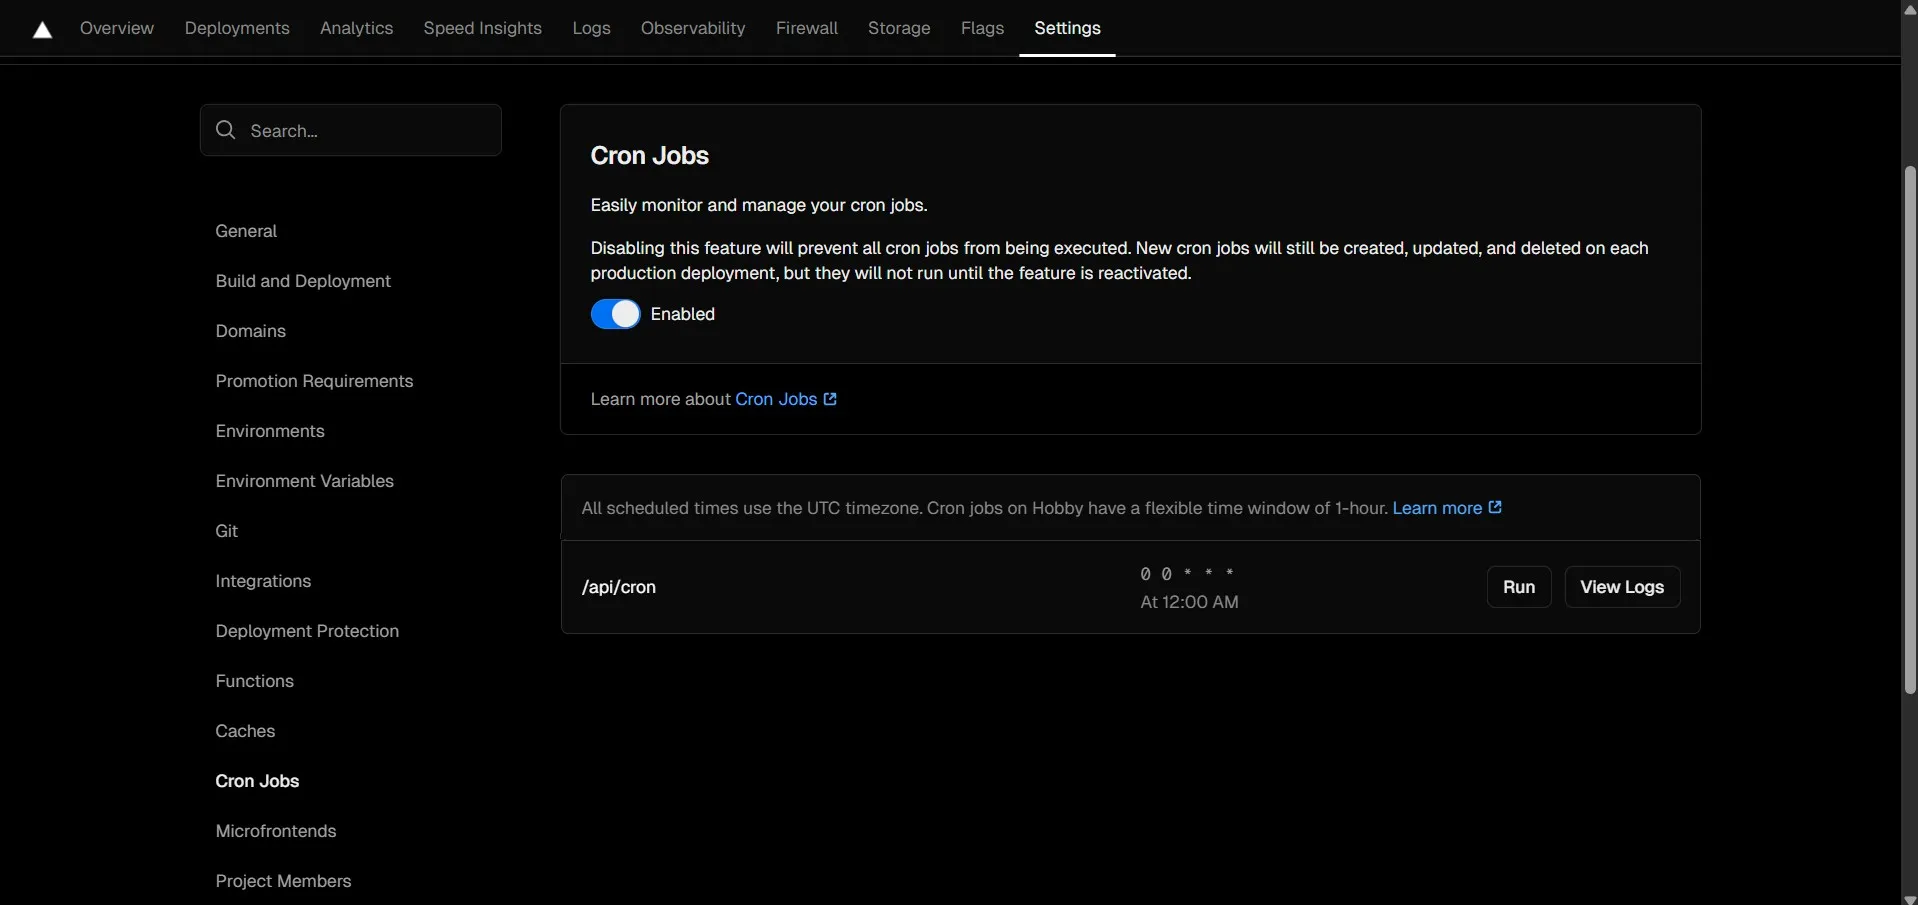
7. To check the result, go to Settings -> Cron Jobs, click "Run" button and select "View Logs".
Vercel Cron Jobs.
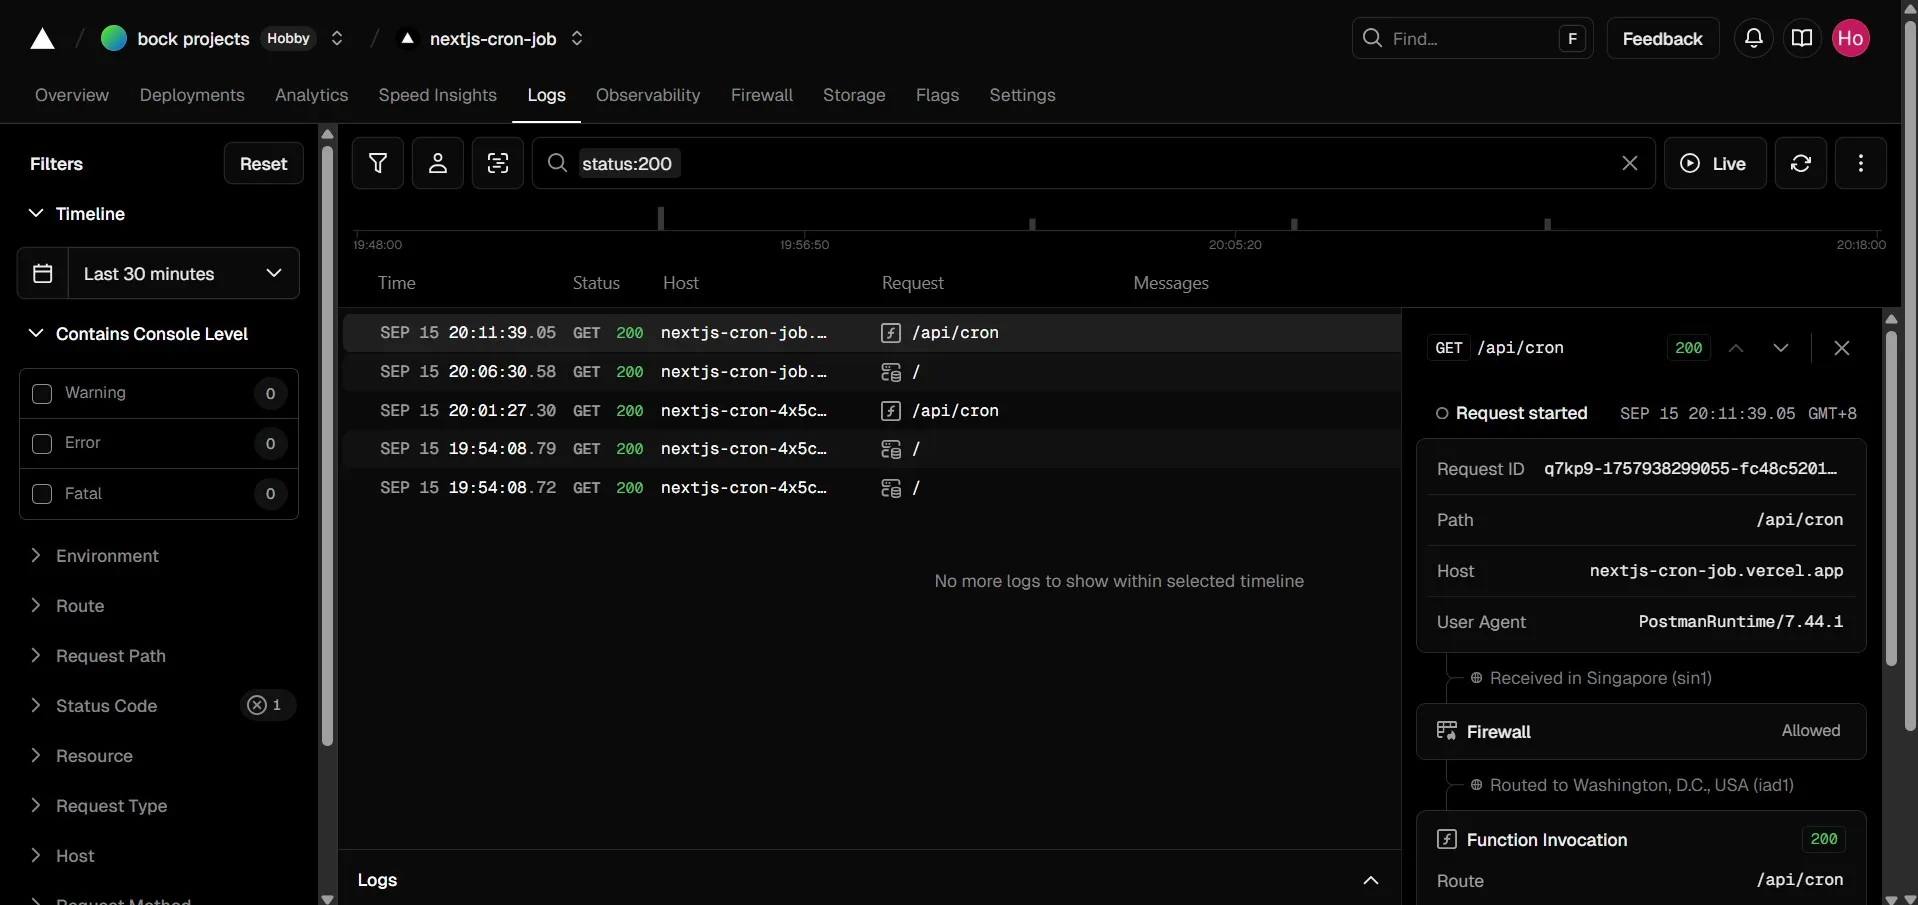
Vercel Logs.
| Pros | Cons |
|---|---|
| Built-in scheduling, no extra infra needed | No native timezone support (UTC only) |
| Great for Next.js/front-end apps already on Vercel | Only works with Vercel-hosted projects |
Simple JSON config with vercel.json |
Conclusion
If your needs are simple and bound to a GitHub repo, GitHub Actions is super quick to get going.
If you need fast execution at the edge or low latency globally, Cloudflare Workers is a strong choice.
For heavy workloads, integration with other AWS services, AWS Lambda + EventBridge is more powerful.
If your app is already deployed on Vercel and you just need lightweight scheduled tasks, then use Vercel Cron Jobs.